Maintain an M16A2 Rifle
CONDITIONS
Given an M16A2 rifle, magazine, 5.56-mm ammunition, small arms maintenance equipment case and lubricating instructions. You have the following cleaning materials: Swabs, pipe cleaner, and cleaner lubricant preservative (CLP). You also have lubricating oil, semifluid, weapons; lubricating oil, Arctic, weapons; and rifle bore cleaner.
STANDARDS
Clean, inspect and lubricate the rifle and magazine so that they function correctly. Clean and inspect the ammunition. Turn in any unserviceable ammunition.
TRAINING AND EVALUATION
Training Information Outline
1. Clear the rifle.
a. Remove the magazine from the rifle, if there is one present.
b. Cock the rifle.
c. Turn the selector to SAFE (A, Figure 5-33).
NOTE: The selector cannot be turned to SAFE unless the rifle is cocked.
d. Lock the bolt open (B, Figure 5-33).
Figure 5-33. Clearing an M16A2 rifle.
e. Pull the charging handle rearward.
f. Press the bottom of the bolt catch.
g. Allow the bolt to move forward until it engages the bolt catch.
h. Return the charging handle to the forward position.
i. Ensure the selector is on SAFE.
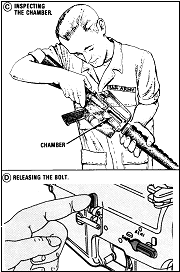
j. Check the receiver and chamber to ensure they do not contain ammunition (C, Figure 5-34).
k. Allow the bolt to go forward by pressing the upper portion of the bolt catch (D, Figure 5-34).
Figure 5-34. Clearing an M16A2 rifle (continued)
2. Disassemble the rifle.
a. Verify the rifle is clear.
b. Remove the sling.
c. Remove the handguards only if you can see dirt or corrosion through the vent holes (Figure 5-35). Handguards on the M16A2 are interchangeable because they are identical.
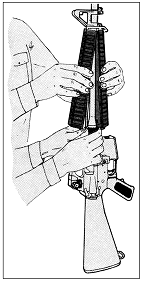
Figure 5-35. Removing the handguards.
1) Push the takedown pin as far as it will go and pivot the upper receiver from the lower receiver (B, Figure 5-36).
2) Push the receiver pivot pin (C, Figure 5-36).
`
3) Separate the upper and lower receivers (D, Figure 5-36).
d. Pull back the charging handle (E, Figure 5-36).
e. Remove the bolt carrier and bolt (F, Figure 5-36).
1) Remove the charging handle (G, Figure 5-36).
2) Remove the firing pin retaining pin (H, Figure 5-36).
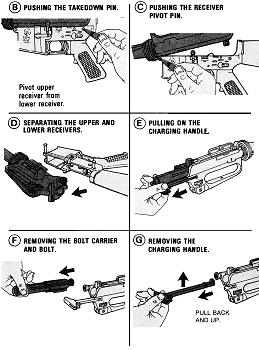
Figure 5-36. Disassembling the rifle.
3) Put the bolt assembly in the locked position by pushing in the bolt (I, Figure 5-36).
4) Remove the firing pin by allowing it to drop out of the rear of the bolt carrier into your hand (J, Figure 5-36).
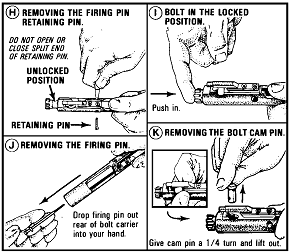
Figure 5-36. Disassembling the rifle (continued).
5) Remove the bolt cam pin by turning it one-quarter turn and lifting it out (K, Figure 5-36).
6) Pull the bolt assembly from the carrier (L, Figure 5-36).
NOTE: Perform steps o through r only when the parts are dirty or damaged.
7) Remove the extractor pin by pushing it out with the firing pin (use care not to damage the firing pin) (M, Figure 5-36).
8) Lift out the extractor and spring (N, Figure 5-36), taking care so that the spring does not separate from the extractor.
NOTE: Press the top of the extractor to check spring function.
f. Release the buffer by pressing the buffer and depressing the retainer.
g. Remove the buffer and action spring separating the buffer from the spring (O, Figure 5-36).
h. Do not disassemble the rifle further.
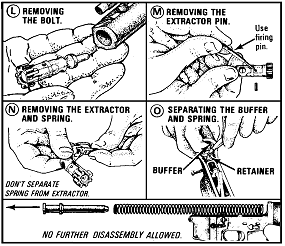
Figure 5-36. Disassembling the rifle (continued).
3. Clean the rifle by removing carbon buildup and lubricating according to lubrication instructions. Make sure you remove any excessive oil from the bore before firing.
NOTE: After firing ball or blank ammunition, clean the weapon with CLP. Under all but the coldest Arctic conditions, use only CLP to lubricate the rifle.
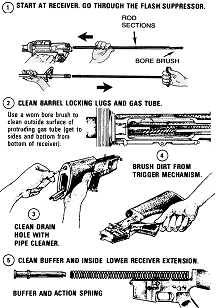
Figure 5-37. Cleaning the Receivers.
a. Clean the upper and lower receiver group using CLP to remove powder fouling in the upper receiver (Figure 5-37).
b. Clean the bolt carrier group, wiping the following parts with swabs and other parts from the small arms maintenance equipment case (Figure 5-38).
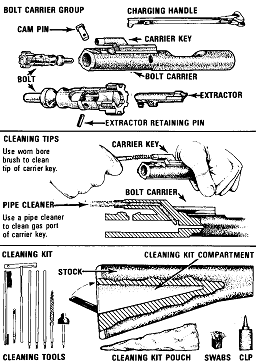
Figure 5-38. Cleaning the bolt carrier group
1) The outer and inner surfaces of the bolt carrier.
2) The carrier key.
3) The firing pin recess and firing pin.
4) The firing pin hole with a pipe cleaner.
5) The carbon deposits and dirt from the locking lugs.
6) The areas behind the bolt ring and under the lip of the extractor.
c. Clean the following rifle parts lightly lubricating with CLP (Figure 5-38).
1) Lugs in the barrel extension, bore, and chamber.
2) Bolt carrier.
3) Slide cam pin area.
4) Piston rings.
5) Outside the bolt body.
6) Inside the bolt carrier key.
7) Firing pin and firing pin recess.
8) Outside surface of the protruding gas tube with a worn bore brush.
9) Buffer.
10) Action spring.
11) Inner surfaces of the lower receiver extension.
12) Inside the lower receiver.
13) All other components.
4. Inspect disassembled rifle bolt assembly (Figure 5-39).
a. Identify defective or missing components.
b. Report deficiencies to the armorer.
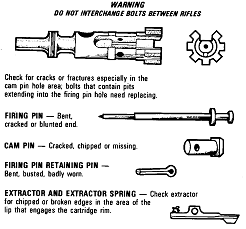
Figure 5-39. Inspecting the bolt assembly
5. Assemble the rifle.
a. Insert the spring and buffer (A, Figure 5-40).
b. Insert the extractor and spring (B, Figure 5-40).
c. Push the extractor pin in (C, Figure 5-40).
d. Slide the bolt into the carrier until the bolt cam pinhole in both the bolt carrier and the bolt are aligned (Figure D, 5-40).
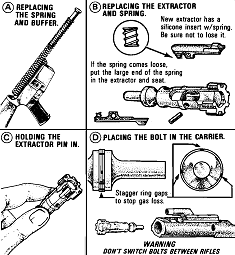
Figure 5-40. Assembling the rifle.
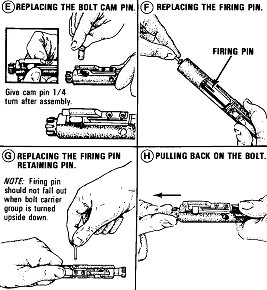
Figure 5-40. Assembling the rifle (continued).
e. Place the bolt cam pin by putting it in the bolt carrier turning it one-quarter turn (E, Figure 5-40).
f. Drop in the firing pin to seat it (F, Figure 5-40).
g. Put the firing pin retaining pin in the bolt carrier to seat it (G, Figure 5-40).
h. Pull the bolt back (H, Figure 5-40).
i. Place the charging handle by engaging it, then pushing the charging handle part of the way in (I, Figure 5-40).
j. Slide the bolt carrier into the upper receiver (J, Figure 5-40).
k. Push the charging handle and bolt carrier together in the upper receiver (K, Figure 5-40).
l. Join the upper and lower receiver (L, Figure 5-40).
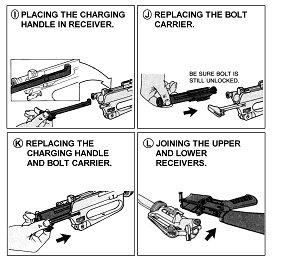
Figure 5-40. Assembling the rifle (continued).
m. Engage the receiver pivot pin (M, Figure 5-40).
n. Close the upper and lower receiver groups, seating the takedown pin, and ensuring the selector switch is on safe (N, Figure 5-40).
o. Put the handguards in place (O, Figure 5-40).
p. Replace the sling (P, Figure 5-40).
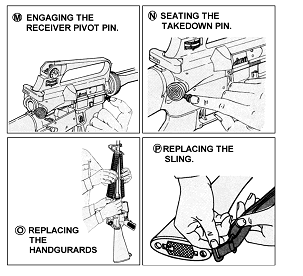
Figure 5-40. Assembling the rifle (continued).
6. Disassemble the magazine without removing the follower from the spring.
a. Release the base catch (A, Figure 5-41).
b. Remove the base (B, Figure 5-41).
c. Remove the spring and follower by jiggling spring and follower (C, Figure 5-41).
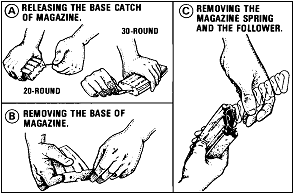
Figure 5-41. Disassembling the magazine.
7. Clean the magazine.
a. Wipe the dirt from the tube, spring and follower.
b. Lubricate the spring lightly.
8. Assemble the magazine.
a. Jiggle the spring and follower together to install them in the magazine.
b. Slide the base under all four tabs, making sure that the print is on the outside.
9. Clean the ammunition using a clean, dry cloth to wipe dirt and foreign matter from the ammunition. Do not coat with oil.